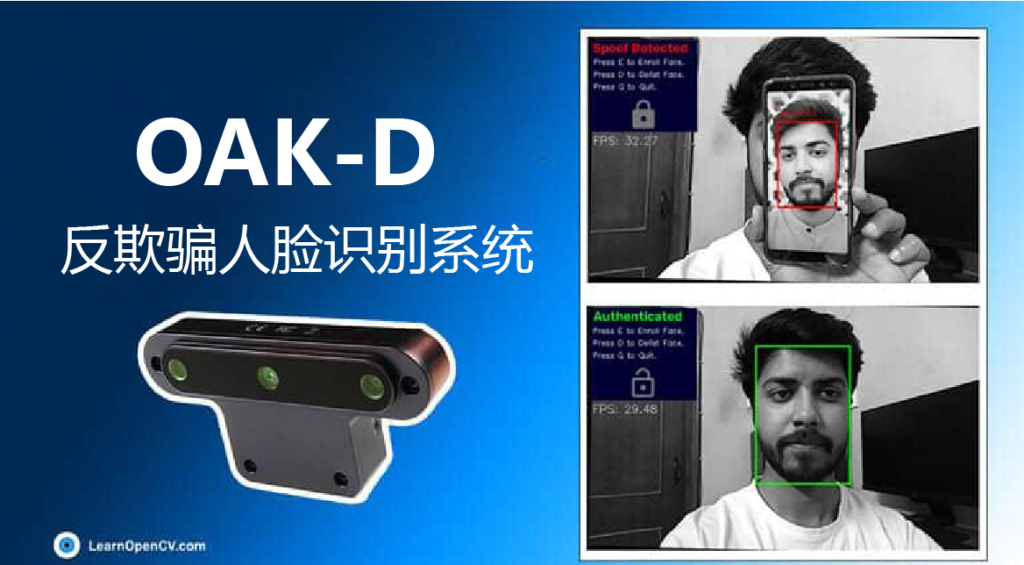
OpenCV CEO教你用OAK(五):基于OAK-D和DepthAI的反欺骗人脸识别系统
在本文中,我们将了解使用人脸识别作为认证方法的优缺点。我们还将看到它是如何被欺骗的,以及可以用来检测欺骗企图的方法。
1.介绍
想象一下这样的场景:你双手甚至手臂上都提着多个袋子,你来到公寓楼的门口,那里有一个门禁系统,你必须输入密码或指纹才能打开,于是你放下袋子,输入密码或触摸指纹,然后再次拿起袋子,然后走进门。
现在,考虑另一种情况。你再次背着所有这些袋子,但现在当你来到你的公寓楼门口时,你只需看着门口的摄像头,瞧!门锁开了,你走了进去。
第二个选项听起来不是更快、更省事吗?这就是用你的脸进行认证的好处;它删减了一两个认证步骤,却让你的生活更方便。
另外,在目前全球新冠肺炎疫情肆虐的情况下,它还可以帮助你避免接触表面,如多人使用的认证系统。
2. 身份验证中的人脸识别及利弊
现在的问题是,如果有密码和指纹等其他认证方法,我们为什么要使用人脸识别呢?
如果上面的例子还不足以说服你尝试面部认证,那么让我们将它与其他流行的认证方法进行比较。
| 密码 | 指纹 | 只有面部识别 | |
| 安全性 | 高 | 中 | 低 |
| 易记忆 | 低 | 高 | 高 |
| 易用性 | 低 | 中 | 高 |
| 识别盗窃 | 高 | 低 | 低 |
我们可以看到,与其他身份验证方法相比,人脸识别的主要优势是方便,缺点是安全性。
那么,我们如何解决这个问题呢?我们先来了解一下什么是人脸识别以及它是如何工作的。
3. 人脸识别
人脸识别是一种借助个人独特的面部特征来识别和辨认个人的方法。
它在医疗服务、执法、客户体验和生物认证等众多领域有着广泛的应用。
4. 面部识别是如何工作的
人脸识别的主要工作原理是每张脸都是唯一的,可以基于面部的这些独特特征来识别一个人。

在识别人脸的关键特征时,它们可以表示为该人脸的特征嵌入;你可以把它想象成那个人的面纹,类似于一个独特的指纹。

现在,面纹可以与其他面纹进行比对,以检查它们有多相似,根据面纹的相似性,我们可以判断是否确实是同一个人。
人脸识别包括以下步骤:
1)人脸检测
首先在相机拍摄的图片帧中检测到人脸,这可以通过不同的面部检测方法来实现,例如Viola-Jones、HOG或CNN。
2)计算特征嵌入(面纹)
下一步是识别面部的关键特征,并将它们表示为特征嵌入,这将是面部的唯一标识符。
3)匹配特征嵌入
最后一步是将人脸的特征嵌入与系统中已经保存的特征嵌入进行匹配。如果它们足够相似,我们可以自信地说,它属于同一个人。
想深入了解人脸识别的工作原理,可以去看看我们之前关于这个话题的文章。
5. 欺骗尝试的类型
有多种方法可以骗过人脸认证系统。常见的方法有:
1)2D图像欺骗
在这种情况下,攻击者试图通过显示被授权人的面部图像来绕过认证。这是最原始的欺骗,任何没有防欺骗措施的人脸认证系统都很容易被它绕过。

2)2D视频欺骗
在这种情况下,攻击者试图通过向认证系统显示被授权人的面部视频来绕过认证。这不同于图像欺骗,因为它可以绕过活体检测反欺骗系统,因为人脸看起来是运动的和逼真的。

3)3D打印/人皮面具攻击
这是一种更先进的欺骗方法,攻击者试图使用面罩或在即将到来的技术允许的情况下使用真脸的3D打印来重现面部的3D特征。这种欺骗很难被发现,并且可以根据脸部的深度信息绕过反欺骗措施。

6. 防止欺骗的技术
不同的欺骗企图需要不同的防范方法:
1)深度估计:
深度估计可用作检测图像/视频欺骗。它通过识别二维图像或视频的深度图和真实的三维人脸之间的差异来工作。我们将在文章的后半部分实现这个方法。

2)活体检测:
这种检测欺骗的方法对于图像欺骗和人脸3D打印欺骗是有效的。它试图通过检测面部特征的自然运动(如眨眼和微笑)来识别一张真实的脸。

7. 我们的方法
让我们看看如何创建我们自己的反欺骗认证系统。
在我们的反欺骗人脸识别的实现中,我们将使用OAK-D设备来捕捉视频帧和周围的深度图。我们将创建一个DepthAI管道,并部署OpenModelZoo上可用的预训练模型,以检测图像帧中的人脸并进行面部识别。我们还将获得面部的深度图,并通过运行在OAK设备上的经过训练的定制模型来运行它,以识别欺骗。
让我们看看什么是OAK和DepthAI。
1)OAK-D
OAK-D(OpenCV AI Kit-Depth)是一款空间人工智能相机,这意味着它不仅可以根据对周围环境的视觉感知,还可以根据深度感知做出决定。
它通过使用一对立体摄像机来估计物体有多远,从而实现深度感知。该相机配备了英特尔Movidius VPU,为视觉和人工智能处理提供动力。
2)DepthAI
DepthAI是一个跨平台API,用于与OAK摄像机进行交互和编程,以利用其所有功能。使用它,我们可以创建复杂的视觉系统,甚至可以在设备上运行定制的模型推理。使用文档可以在这里查看。
我们已经在系列文章中深入探讨了OAK-D和DepthAI,链接如下。
8. 执行
让我们开始实施我们的系统。
1)先决条件
- Python环境
- OAK-D设备
- 以下Python模块
depthai == 2.10.0.0
opencv-contrib-python == 4.5.2.54
blobconverter == 1.2.9
scipy == 1.7.3
2)代码
导入库
import cv2
import numpy as np
import depthai as dai
import os
import time
from face_auth import enroll_face, delist_face, authenticate_emb
import blobconverter
创建DepthAI管道
我们创建DepthAI管道来获得深度图、右相机,并运行所有神经网络模型来进行人脸检测、人脸识别和深度分类。
我们正在使用“face-detection-retail-0004”人脸检测模型和“Sphereface”人脸识别模型。这两个预训练的模型都可以在Open Model Zoo获取。
用于欺骗检测。我们已经使用Keras训练了一个简单的CNN二元分类器来在真实和欺骗人脸的深度图之间进行分类。


由于DepthAI和OAK本身不支持keras模型的推断,我们使用blob转换器将训练好的模型转换为depthai支持的blob格式,以便我们可以在OAK设备上运行它。

# Define Depth Classification model input size
DEPTH_NN_INPUT_SIZE = (64, 64)

# Define Face Detection model name and input size
# If you define the blob make sure the DET_MODEL_NAME and DET_ZOO_TYPE are None
DET_INPUT_SIZE = (300, 300)
DET_MODEL_NAME = "face-detection-retail-0004"
DET_ZOO_TYPE = "depthai"
det_blob_path = None

# Define Face Recognition model name and input size
# If you define the blob make sure the REC_MODEL_NAME and REC_ZOO_TYPE are None
REC_MODEL_NAME = "Sphereface"
REC_ZOO_TYPE = "intel"
rec_blob_path = None


# Create DepthAi pipeline
def create_depthai_pipeline():
    # Start defining a pipeline
    pipeline = dai.Pipeline()

    # Define a source - two mono (grayscale) cameras
    left = pipeline.createMonoCamera()
    left.setResolution(dai.MonoCameraProperties.SensorResolution.THE_400_P)
    left.setBoardSocket(dai.CameraBoardSocket.LEFT)

    right = pipeline.createMonoCamera()
    right.setResolution(dai.MonoCameraProperties.SensorResolution.THE_400_P)
    right.setBoardSocket(dai.CameraBoardSocket.RIGHT)

    # Create a node that will produce the depth map
    depth = pipeline.createStereoDepth()
    depth.setConfidenceThreshold(200)
    depth.setOutputRectified(True)  # The rectified streams are horizontally mirrored by default
    depth.setRectifyEdgeFillColor(0)  # Black, to better see the cutout
    depth.setExtendedDisparity(True)  # For better close range depth perception

    median = dai.StereoDepthProperties.MedianFilter.KERNEL_7x7  # For depth filtering
    depth.setMedianFilter(median)

    # Linking mono cameras with depth node
    left.out.link(depth.left)
    right.out.link(depth.right)

    # Create left output
    xOutRight = pipeline.createXLinkOut()
    xOutRight.setStreamName("right")
    depth.rectifiedRight.link(xOutRight.input)

    # Create depth output
    xOutDisp = pipeline.createXLinkOut()
    xOutDisp.setStreamName("disparity")
    depth.disparity.link(xOutDisp.input)

    # Create input and output node for Depth Classification
    xDepthIn = pipeline.createXLinkIn()
    xDepthIn.setStreamName("depth_in")
    xOutDepthNn = pipeline.createXLinkOut()
    xOutDepthNn.setStreamName("depth_nn")

    # Define Depth Classification NN node
    depthNn = pipeline.createNeuralNetwork()
    depthNn.setBlobPath("data/depth-classification-models/depth_classification_ipscaled_model.blob")
    depthNn.input.setBlocking(False)

    # Linking
    xDepthIn.out.link(depthNn.input)
    depthNn.out.link(xOutDepthNn.input)

    # Convert detection model from OMZ to blob
    if DET_MODEL_NAME is not None:
        facedet_blob_path = blobconverter.from_zoo(
            name=DET_MODEL_NAME,
            shaves=6,
            zoo_type=DET_ZOO_TYPE
        )

    # Create Face Detection NN node
    faceDetNn = pipeline.createMobileNetDetectionNetwork()
    faceDetNn.setConfidenceThreshold(0.75)
    faceDetNn.setBlobPath(facedet_blob_path)

    # Create ImageManip to convert grayscale mono camera frame to RGB
    copyManip = pipeline.createImageManip()
    depth.rectifiedRight.link(copyManip.inputImage)
    # copyManip.initialConfig.setHorizontalFlip(True)
    copyManip.initialConfig.setFrameType(dai.RawImgFrame.Type.RGB888p)

    # Create ImageManip to preprocess input frame for detection NN
    detManip = pipeline.createImageManip()
    # detManip.initialConfig.setHorizontalFlip(True)
    detManip.initialConfig.setResize(DET_INPUT_SIZE[0], DET_INPUT_SIZE[1])
    detManip.initialConfig.setKeepAspectRatio(False)

    # Linking detection ImageManip to detection NN
    copyManip.out.link(detManip.inputImage)
    detManip.out.link(faceDetNn.input)

    # Create output steam for detection output
    xOutDet = pipeline.createXLinkOut()
    xOutDet.setStreamName('det_out')
    faceDetNn.out.link(xOutDet.input)

    # Script node will take the output from the face detection NN as an input and set ImageManipConfig
    # to crop the initial frame for recognition NN
    script = pipeline.create(dai.node.Script)
    script.setProcessor(dai.ProcessorType.LEON_CSS)
    script.setScriptPath("script.py")

    # Set inputs for script node
    copyManip.out.link(script.inputs['frame'])
    faceDetNn.out.link(script.inputs['face_det_in'])

    # Convert recognition model from OMZ to blob
    if REC_MODEL_NAME is not None:
        facerec_blob_path = blobconverter.from_zoo(
            name=REC_MODEL_NAME,
            shaves=6,
            zoo_type=REC_ZOO_TYPE
        )

    # Create Face Recognition NN node
    faceRecNn = pipeline.createNeuralNetwork()
    faceRecNn.setBlobPath(facerec_blob_path)

    # Create ImageManip to preprocess frame for recognition NN
    recManip = pipeline.createImageManip()

    # Set recognition ImageManipConfig from script node
    script.outputs['manip_cfg'].link(recManip.inputConfig)
    script.outputs['manip_img'].link(recManip.inputImage)

    # Create output stream for recognition output
    xOutRec = pipeline.createXLinkOut()
    xOutRec.setStreamName('rec_out')
    faceRecNn.out.link(xOutRec.input)

    recManip.out.link(faceRecNn.input)

    return pipeline
Script.py
在上面的管道中,我们使用了一个脚本节点,该节点将人脸检测神经网络的输出作为输入,并为人脸识别神经网络设置ImageManipConfig。
import time


# Correct the bounding box
def correct_bb(bb):
    bb.xmin = max(0, bb.xmin)
    bb.ymin = max(0, bb.ymin)
    bb.xmax = min(bb.xmax, 1)
    bb.ymax = min(bb.ymax, 1)
    return bb


# Main loop
while True:
    time.sleep(0.001)

    # Get image frame
    img = node.io['frame'].get()

    # Get detection output
    face_dets = node.io['face_det_in'].tryGet()
    if face_dets and img is not None:

        # Loop over all detections
        for det in face_dets.detections:

            # Correct bounding box
            correct_bb(det)
            node.warn(f"New detection {det.xmin}, {det.ymin}, {det.xmax}, {det.ymax}")

            # Set config parameters
            cfg = ImageManipConfig()
            cfg.setCropRect(det.xmin, det.ymin, det.xmax, det.ymax)
            cfg.setResize(96, 112)  # Input size of Face Rec model
            cfg.setKeepAspectRatio(False)

            # Output image and config
            node.io['manip_cfg'].send(cfg)
            node.io['manip_img'].send(img)
助手功能
我们使用overlay_symbol和display_info用于在输出画面上显示锁定/解锁符号和其他信息的功能。
# Load image of a lock in locked position
locked_img = cv2.imread(os.path.join('data', 'images', 'lock_grey.png'), -1)
# Load image of a lock in unlocked position
unlocked_img = cv2.imread(os.path.join('data', 'images', 'lock_open_grey.png'), -1)


# Overlay lock/unlock symbol on the frame
def overlay_symbol(frame, img, pos=(65, 100)):
    """
    This function overlays the image of lock/unlock
    if the authentication of the input frame
    is successful/failed.
    """
    # Offset value for the image of the lock/unlock
    symbol_x_offset = pos[0]
    symbol_y_offset = pos[1]

    # Find top left and bottom right coordinates
    # where to place the lock/unlock image
    y1, y2 = symbol_y_offset, symbol_y_offset + img.shape[0]
    x1, x2 = symbol_x_offset, symbol_x_offset + img.shape[1]

    # Scale down alpha channel between 0 and 1
    mask = img[:, :, 3]/255.0
    # Inverse of the alpha mask
    inv_mask = 1-mask

    # Iterate over the 3 channels - R, G and B
    for c in range(0, 3):
        # Add the lock/unlock image to the frame
        frame[y1:y2, x1:x2, c] = (mask * img[:, :, c] +
                                  inv_mask * frame[y1:y2, x1:x2, c])


# Display info on the frame
def display_info(frame, bbox, status, status_color, fps):
    # Display bounding box
    cv2.rectangle(frame, bbox, status_color[status], 2)

    # If spoof detected
    if status == 'Spoof Detected':
        # Display "Spoof detected" status on the bbox
        cv2.putText(frame, "Spoofed", (bbox[0], bbox[1] - 10), cv2.FONT_HERSHEY_SIMPLEX, 0.5, status_color[status])

    # Create background for showing details
    cv2.rectangle(frame, (5, 5, 175, 150), (50, 0, 0), -1)

    # Display authentication status on the frame
    cv2.putText(frame, status, (20, 25), cv2.FONT_HERSHEY_SIMPLEX, 0.5, status_color[status])

    # Display lock symbol
    if status == 'Authenticated':
        overlay_symbol(frame, unlocked_img)
    else:
        overlay_symbol(frame, locked_img)

    # Display instructions on the frame
    cv2.putText(frame, 'Press E to Enroll Face.', (10, 45), cv2.FONT_HERSHEY_SIMPLEX, 0.4, (255, 255, 255))
    cv2.putText(frame, 'Press D to Delist Face.', (10, 65), cv2.FONT_HERSHEY_SIMPLEX, 0.4, (255, 255, 255))
    cv2.putText(frame, 'Press Q to Quit.', (10, 85), cv2.FONT_HERSHEY_SIMPLEX, 0.4, (255, 255, 255))
    cv2.putText(frame, f'FPS: {fps:.2f}', (10, 175), cv2.FONT_HERSHEY_SIMPLEX, 0.6, (255, 255, 255))
face_auth.py Module
我们创建了一个face_auth.py模块来处理面部认证。
我们使用以下三个face_auth函数即authenticate_face, enlist_face and delist_face。
authenticate_face
输入:图像帧
返回:boolean(表示检测到的人脸是否经过验证),检测到的人脸的边界框。
enroll_face
它将图像作为输入,并为检测到的人脸保存人脸嵌入。
输入:image_frame
delist_face
它将图像作为输入,并为检测到的人脸去除人脸嵌入。
输入:image_frame
from scipy import spatial

# Feature embedding vector of enrolled faces
enrolled_faces = []

# The minimum distance between two faces
# to be called unique
authentication_threshold = 0.30


def enroll_face(embeddings):
    """
    This function adds the feature embedding
    for given face to the list of enrolled faces.
    This entire process is equivalent to
    face enrolment.
    """
    # Get feature embedding vector
    for embedding in embeddings:
        # Add feature embedding to list of
        # enrolled faces
        enrolled_faces.append(embedding)


def delist_face(embeddings):
    """
    This function removes a face from the list
    of enrolled faces.
    """
    # Get feature embedding vector for input images
    global enrolled_faces
    if len(embeddings) > 0:
        for embedding in embeddings:
            # List of faces remaining after delisting
            remaining_faces = []
            # Iterate over the enrolled faces
            for idx, face_emb in enumerate(enrolled_faces):
                # Compute distance between feature embedding
                # for input images and the current face's
                # feature embedding
                dist = spatial.distance.cosine(embedding, face_emb)
                # If the above distance is more than or equal to
                # threshold, then add the face to remaining faces list
                # Distance between feature embeddings
                # is equivalent to the difference between
                # two faces
                if dist >= authentication_threshold:
                    remaining_faces.append(face_emb)
            # Update the list of enrolled faces
            enrolled_faces = remaining_faces


def authenticate_emb(embedding):
    """
    This function checks if a similar face
    embedding is present in the list of
    enrolled faces or not.
    """
    # Set authentication to False by default
    authentication = False

    if embedding is not None:
        # Iterate over all the enrolled faces
        for face_emb in enrolled_faces:
            # Compute the distance between the enrolled face's
            # embedding vector and the input image's
            # embedding vector
            dist = spatial.distance.cosine(embedding, face_emb)
            # If above distance is less the threshold
            if dist < authentication_threshold:
                # Set the authenatication to True
                # meaning that the input face has been matched
                # to the current enrolled face
                authentication = True
        if authentication:
            # If the face was authenticated
            return True
        else:
            # If the face was not authenticated
            return False
    # Default
    return None
获取帧并执行身份验证的主循环
首先,我们从输出流中获得正确的图片帧、深度帧和神经网络。
一旦我们从人脸检测输出中获得了边界框,我们就可以使用它从深度图中获得人脸区域,并将其输入到管道中,以通过之前训练的深度分类器来检查人脸是真实的还是伪造的。
在验证人脸是真实的之后,我们将检索到的人脸嵌入特征传递给authenticate_face函数,该函数将返回一个布尔值,指示人脸是否经过身份验证。
如果面部没有被认证,我们可以使用enroll_face函数来注册面部并保存它的嵌入。类似地,我们可以使用delist_face函数来删除已经注册的人脸。
最后,我们将所有信息显示在框架上。

frame_count = 0  # Frame count
fps = 0  # Placeholder fps value
prev_frame_time = 0  # Used to record the time when we processed last frames
new_frame_time = 0  # Used to record the time at which we processed current frames

# Set status colors
status_color = {
    'Authenticated': (0, 255, 0),
    'Unauthenticated': (0, 0, 255),
    'Spoof Detected': (0, 0, 255),
    'No Face Detected': (0, 0, 255)
}

# Create Pipeline
pipeline = create_depthai_pipeline()

# Initialize device and start Pipeline
with dai.Device(pipeline) as device:
    # Start pipeline
    device.startPipeline()

    # Output queue to get the right camera frames
    qRight = device.getOutputQueue(name="right", maxSize=4, blocking=False)

    # Output queue to get the disparity map
    qDepth = device.getOutputQueue(name="disparity", maxSize=4, blocking=False)

    # Input queue to send face depth map to the device
    qDepthIn = device.getInputQueue(name="depth_in")

    # Output queue to get Depth Classification nn data
    qDepthNn = device.getOutputQueue(name="depth_nn", maxSize=4, blocking=False)

    # Output queue to get Face Recognition nn data
    qRec = device.getOutputQueue(name="rec_out", maxSize=4, blocking=False)

    # Output queue to get Face Detection nn data
    qDet = device.getOutputQueue(name="det_out", maxSize=4, blocking=False)

    while True:
        # Get right camera frame
        inRight = qRight.get()
        r_frame = inRight.getFrame()
        # r_frame = cv2.flip(r_frame, flipCode=1)

        # Get depth frame
        inDepth = qDepth.get()  # blocking call, will wait until a new data has arrived
        depth_frame = inDepth.getFrame()
        depth_frame = cv2.flip(depth_frame, flipCode=1)
        depth_frame = np.ascontiguousarray(depth_frame)
        depth_frame = cv2.bitwise_not(depth_frame)

        # Apply color map to highlight the disparity info
        depth_frame_cmap = cv2.applyColorMap(depth_frame, cv2.COLORMAP_JET)
        # Show disparity frame
        cv2.imshow("disparity", depth_frame_cmap)

        # Convert grayscale image frame to 'bgr' (opencv format)
        frame = cv2.cvtColor(r_frame, cv2.COLOR_GRAY2BGR)

        # Get image frame dimensions
        img_h, img_w = frame.shape[0:2]

        bbox = None

        # Get detection NN output
        inDet = qDet.tryGet()

        if inDet is not None:
            # Get face bbox detections
            detections = inDet.detections

            if len(detections) is not 0:
                # Use first detected face bbox
                detection = detections[0]
                # print(detection.confidence)
                x = int(detection.xmin * img_w)
                y = int(detection.ymin * img_h)
                w = int(detection.xmax * img_w - detection.xmin * img_w)
                h = int(detection.ymax * img_h - detection.ymin * img_h)
                bbox = (x, y, w, h)

        face_embedding = None
        authenticated = False

        # Check if a face was detected in the frame
        if bbox:

            # Get face roi depth frame
            face_d = depth_frame[max(0, bbox[1]):bbox[1] + bbox[3], max(0, bbox[0]):bbox[0] + bbox[2]]
            cv2.imshow("face_roi", face_d)

            # Preprocess face depth map for classification
            resized_face_d = cv2.resize(face_d, DEPTH_NN_INPUT_SIZE)
            resized_face_d = resized_face_d.astype('float16')

            # Create Depthai Imageframe
            img = dai.ImgFrame()
            img.setFrame(resized_face_d)
            img.setWidth(DEPTH_NN_INPUT_SIZE[0])
            img.setHeight(DEPTH_NN_INPUT_SIZE[1])
            img.setType(dai.ImgFrame.Type.GRAYF16)

            # Send face depth map to depthai pipeline for classification
            qDepthIn.send(img)

            # Get Depth Classification NN output
            inDepthNn = qDepthNn.tryGet()

            is_real = None

            if inDepthNn is not None:
                # Get prediction
                cnn_output = inDepthNn.getLayerFp16("dense_2/Sigmoid")
                # print(cnn_output)
                if cnn_output[0] > .5:
                    prediction = 'spoofed'
                    is_real = False
                else:
                    prediction = 'real'
                    is_real = True
                print(prediction)

            if is_real:
                # Check if the face in the frame was authenticated

                # Get recognition NN output
                inRec = qRec.tryGet()
                if inRec is not None:
                    # Get embedding of the face
                    face_embedding = inRec.getFirstLayerFp16()
                    # print(len(face_embedding))

                    authenticated = authenticate_emb(face_embedding)

                if authenticated:
                    # Authenticated
                    status = 'Authenticated'
                else:
                    # Unauthenticated
                    status = 'Unauthenticated'
            else:
                # Spoof detected
                status = 'Spoof Detected'
        else:
            # No face detected
            status = 'No Face Detected'

        # Display info on frame
        display_info(frame, bbox, status, status_color, fps)

        # Calculate average fps
        if frame_count % 10 == 0:
            # Time when we finish processing last 10 frames
            new_frame_time = time.time()

            # Fps will be number of frame processed in one second
            fps = 1 / ((new_frame_time - prev_frame_time)/10)
            prev_frame_time = new_frame_time

        # Capture the key pressed
        key_pressed = cv2.waitKey(1) & 0xff

        # Enrol the face if e was pressed
        if key_pressed == ord('e'):
            if is_real:
                enroll_face([face_embedding])
        # Delist the face if d was pressed
        elif key_pressed == ord('d'):
            if is_real:
                delist_face([face_embedding])
        # Stop the program if q was pressed
        elif key_pressed == ord('q'):
            break

        # Display the final frame
        cv2.imshow("Authentication Cam", frame)

        # Increment frame count
        frame_count += 1

# Close all output windows
cv2.destroyAllWindows()
9. 演示


10.失败的地方
所提出的反电子欺骗系统防止了试图绕过认证的常见攻击,甚至阻止了用于绕过活体检测系统的视频攻击,但是仍然存在其失败的情况,例如可以使用面部几何形状的彩色3d打印来绕过它。
对于任何系统来说,检测3d面具的欺骗都是一项挑战,因为它使欺骗者的脸与经过身份验证的人的脸非常相似。
11.未来的改进
就检测电子欺骗的能力而言,当前的实现可以以多种方式改进。
正如在失败的情况下所提到的,可以通过使用模拟面部的3d轮廓的3d面纹来绕过该系统,为了避免这种情况,我们可以结合活动性检测来使用这一点,在活体检测的帮助下,我们可以检测面部是否是真实的和活的,而不仅仅是模拟的。
现在,分类模型是用简单的例子来训练的。我们可以训练一个更强大的分类模型,考虑图像和视频欺骗中的所有变化。
12. 结论-理想的系统
正如你可能已经想到的那样,到目前为止,每种欺骗防范方法都针对特定的情况,在其他的情况下会失败。
活体检测方法只能识破图像欺骗,而不能识破任何其他欺骗。
深度检测方法能识破图像和视频欺骗,但对于3D打印人脸失效。
如果只部署一种方法,深度检测仍然是首选,因为它可以防止大多数欺骗。此外,它防止的欺骗是最常见的,可以很容易地执行。
但是一个理想的反欺骗系统不应该依赖于单一的方法,而是必须结合多种方法一起工作,以尽可能多地防止欺骗企图。
文章来源:learnopencv.com