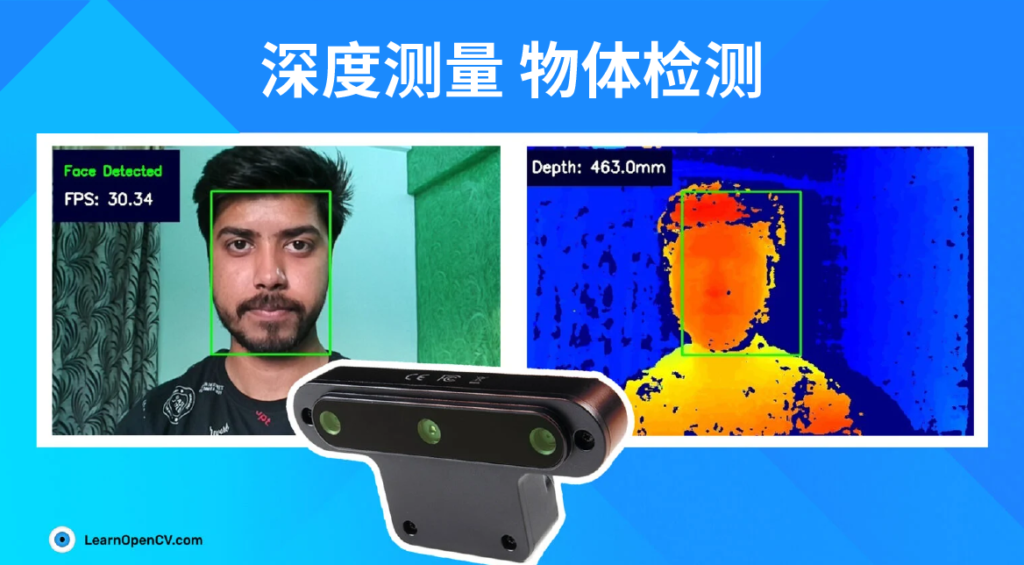
OpenCV CEO教你用OAK(三):使用OAK的预训练模型进行深度测量与物体检测
这是这个系列博客的第三篇,前两篇博客内容如下:
本文我们将学习如何在OAK设备上运行现有的预训练模型,并进行推理。
1. OAK和DepthAI简要概述
在之前的博客中,我们对OAK-D进行了概述,并看到了它如何提供不同的相机来计算视差和深度。
OAK-D和OAK-D-Lite不仅仅是立体相机,还配备了Myriad X VPU。VPU(视觉处理单元)允许OAK-D在设备上执行多种操作,如图像处理(扭曲,去扭曲,调整大小,裁剪,边缘检测等)、RGB深度对齐、跟踪,甚至可以运行自定义的计算机视觉功能。
VPU支持神经网络推理(只要它被转换为blob格式),你甚至可以同时运行多个AI模型,无论是并行还是串行。
OAK的这种能力使其成为满足计算机视觉需求一体化的平台。此外opencv.org还有人工智能、计算机视觉和深度学习的官方课程,可让你从初级到精通。
2. 支持的模型
OAK相机可以运行任何人工智能模型,甚至是定制的模型。它甚至可以同时运行多个AI模型,无论是并行还是串行。
在使用定制训练的模型之前,您需要将它们转换为MyriadX blob文件格式,以便它们在MyriadX VPU处理器上进行优化以获得最佳推断。
为了获得blob文件,必须采取两个转换步骤:
- 使用模型优化器生成OpenVINO IR表示(其中IR代表中间表示)
- 使用模型编译器将IR表示转换为MyriadX blob

除此之外,你还可以访问在线MyriadX Blob转换器,它允许指定不同的OpenVINO目标版本,并支持从TensorFlow、Caffe、OpenVINO IR和OpenVINO Model Zoo的转换。

为了自动使用我们的blobconverter工具,有一个blobconverter PyPi包,它允许直接从命令行和Python脚本编译MyriadX blobs。
后者是我们将在下面的例子中使用的,可以在这里找到安装和使用说明。
3. 预训练模型
罗列的以下模型来源,均可以部署到OAK上:
Open Model Zoo提供了各种免费的、高度优化的预训练深度学习模型,这些模型在英特尔CPU、GPU和vpu上运行速度惊人。
这个存储库包含200多个神经网络模型,用于对象检测、分类、图像分割、手写识别、文本到语音、姿态估计等任务。
有两种模式。
- 英特尔预先训练的模型:英特尔的团队已经训练了这些模型,并对它们进行了优化,以便与OpenVINO一起运行。
- 公共预训练模型:这些是由AI社区创建的模型,可以使用OpenVINO Model Optimizer轻松转换为OpenVINO格式。
OpenCV AI Kit正迅速成为许多计算机视觉应用程序开发人员首选的嵌入式平台。为了帮助用户更好地了解该平台的功能,OAK的创建者Luxonis创建了 DepthAI Model Zoo。它是Luxonis OpenCV AI Kit平台的即用型开源模型的不断增长的集合。
随着新模型添加到模型动物园中,您可以找到用于诸如单目深度估计、对象检测分割、面部标志检测、文本检测、分类等任务的模型。
它是人工智能是机器学习模型的市场,也是社区分享定制训练模型的平台。
它有一个不断增长的OAK兼容模型集合,用于各种计算机视觉任务,无论是分类、对象检测、姿势估计还是文本检测。
它带有一个网络界面,可以用你的自定义图像来尝试你喜欢的模型。您还可以在标准基准上比较执行类似任务的模型。
4. nodes概述
神经网络
该节点使用输入数据上定义的模型运行神经推理。
这个节点给出了神经网络的原始输出,这意味着你必须自己解码输出。
这是您在实现自定义模型时要使用的节点。

输入:
- 要对其执行推理的图像
产出:
- 原始神经网络输出
- 作为下一阶段的输入
语法:
pipeline = dai.Pipeline()
nn = pipeline.create(dai.node.NeuralNetwork)
MobileNetDetectionNetwork
MobileNet检测网络node扩展了NeuralNetwork node。
唯一的区别是这个node是专门为MobileNet NN,并在设备上解码NN的结果。这意味着从这个node出来的不是字节数组而是一个ImgDetections,可以很容易地在您的代码中使用。

输入:
- 要对其执行检测的图像
产出:
- 检测输出
- 输入图像
语法:
pipeline = dai.Pipeline()
mobilenetDet = pipeline.create(dai.node.MobileNetDetectionNetwork)
MobileNetSpatialDetectionNetwork
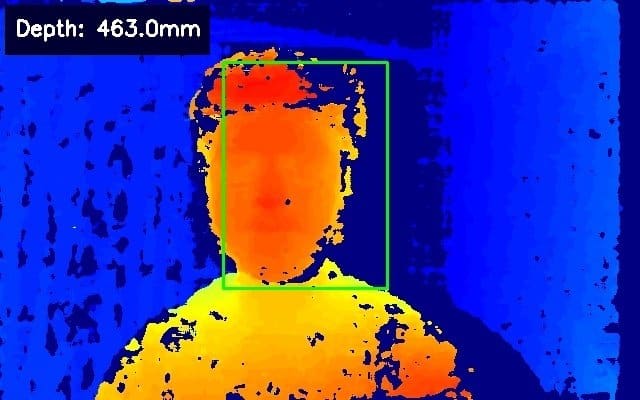
MobileNetSpatial检测网络node的工作方式类似于MobileNet检测网络node,但是与检测结果一起,它还输出边界框的空间位置。
这个网络node在功能上反映了mobilenet检测网络节点之上的SpacialLocator node。SpacialLocator node给出了深度帧的平均距离。

输入:
- 要对其执行检测的图像
- 深度帧
产出:
- 检测输出
- 输入图像
- 输入深度
语法:
pipeline = dai.Pipeline()
mobilenetSpatial = pipeline.create(dai.node.MobileNetSpatialDetectionNetwork)
类似MobileNetDetectionNetwork 和MobileNetSpatialDetectionNetwork,我们有YoloDetectionNetwork 和YoloSpatialDetectionNetwork 以从yolo网络获得解码的检测和空间检测输出。
5. pipeline概述

6. 示例演示
导入库
import cv2
import depthai as dai
import timeimport blobconverter
定义帧大小
FRAME_SIZE = (640, 360)
定义神经网络模型名称和输入大小
定义输入大小、名称以及从哪里下载该模型的动物园名称(仅支持“depthai”和“intel”作为时间)。
注意:如果直接定义blob文件的路径,请确保MODEL_NAME和ZOO_TYPE设置为None。
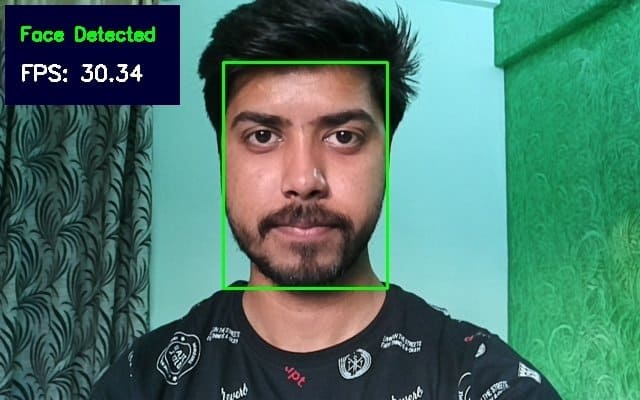
对于这个演示,我们使用的是来自depthai model zoo的“face-detection-retail-0004”人脸检测模型。
DET_INPUT_SIZE = (300, 300)
model_name = "face-detection-retail-0004"
zoo_type = "depthai"
blob_path = None
创建pipeline
开始定义pipeline
pipeline = dai.Pipeline()定义RGB相机来源
获取RGB相机帧
cam = pipeline.createColorCamera()
cam.setPreviewSize(FRAME_SIZE[0], FRAME_SIZE[1])
cam.setInterleaved(False)
cam.setResolution(dai.ColorCameraProperties.SensorResolution.THE_1080_P)
cam.setBoardSocket(dai.CameraBoardSocket.RGB)
定义深度相机来源
mono_left = pipeline.createMonoCamera()
mono_left.setResolution(dai.MonoCameraProperties.SensorResolution.THE_400_P)
mono_left.setBoardSocket(dai.CameraBoardSocket.LEFT)
mono_right = pipeline.createMonoCamera()
mono_right.setResolution(dai.MonoCameraProperties.SensorResolution.THE_400_P)
mono_right.setBoardSocket(dai.CameraBoardSocket.RIGHT)
创建stereo node
stereo = pipeline.createStereoDepth()将深度相机的输出链接到stereo node
mono_left.out.link(stereo.left)
mono_right.out.link(stereo.right)
使用blobconverter获取所需模型的blob文件
我们使用blobconverter编译并下载先前从所选模型zoo、“depthai”或“intel”中定义的模型。
我们还指定了“shaves”参数,这告诉blobconverter编译模型以在指定数量的“shaves”上运行。
这sblobconverter中的’shaves’参数决定了用于编译神经网络的SHAVE核的数量。该值越高,网络的运行速度就越快。
if model_name is not None:
    blob_path = blobconverter.from_zoo(
        name=model_name,
        shaves=6,
        zoo_type=zoo_type
) 什么是SHAVES?
SHAVES是DepthAI/OAK的矢量处理器。
除了运行神经网络,这些SHAVES还用于设备中的其他事情,如处理图像的重新格式化,做一些ISP等。
所以,你一次能使用多少SHAVES是有限制的。分辨率越高,消耗的SHAVES就越多。
- 对于1080p,有13个SHAVES(16个)可用于神经网络的东西。
- 对于4K传感器分辨率,10个SHAVES可用于神经操作。
定义人脸检测神经网络节点
face_spac_det_nn = pipeline.createMobileNetSpatialDetectionNetwork()
face_spac_det_nn.setConfidenceThreshold(0.75)
face_spac_det_nn.setBlobPath(blob_path)
face_spac_det_nn.setDepthLowerThreshold(100)
face_spac_det_nn.setDepthUpperThreshold(5000)
定义人脸检测输入配置
为神经网络输入预处理图像帧,为此我们使用ImageManip节点。
ImageManip节点可以对输入图像应用不同的转换,并将转换后的图像作为输出。
这里,该节点用于将来自相机的图像帧调整到模型接受的尺寸。我们将在后面的文章中更深入地了解这个节点和其他节点。
face_det_manip = pipeline.createImageManip()
face_det_manip.initialConfig.setResize(DET_INPUT_SIZE[0], DET_INPUT_SIZE[1])
face_det_manip.initialConfig.setKeepAspectRatio(False)face_det_manip = pipeline.createImageManip()
face_det_manip.initialConfig.setResize(DET_INPUT_SIZE[0], DET_INPUT_SIZE[1])
face_det_manip.initialConfig.setKeepAspectRatio(False)
连接
我们将rgb相机输出连接到ImageManip节点,将ImageManip节点的输出连接到神经网络输入,将立体深度输出连接到NN节点。
cam.preview.link(face_det_manip.inputImage)
face_det_manip.out.link(face_spac_det_nn.input)stereo.depth.link(face_spac_det_nn.inputDepth)
创建预览输出
创建stream流以获取相机的输出。
x_preview_out = pipeline.createXLinkOut()
x_preview_out.setStreamName("preview")
cam.preview.link(x_preview_out.input)
创建检测输出
创建stream流以获得神经网络的输出。
det_out = pipeline.createXLinkOut()
det_out.setStreamName('det_out')
face_spac_det_nn.out.link(det_out.input)
定义显示功能
我们定义了一个函数来在图像帧上显示信息。
def display_info(frame, bbox, coordinates, status, status_color, fps):
    # Display bounding box
    cv2.rectangle(frame, bbox, status_color[status], 2)

    # Display coordinates
    if coordinates is not None:
        coord_x, coord_y, coord_z = coordinates
        cv2.putText(frame, f"X: {int(coord_x)} mm", (bbox[0] + 10, bbox[1] + 20), cv2.FONT_HERSHEY_TRIPLEX, 0.5, 255)
        cv2.putText(frame, f"Y: {int(coord_y)} mm", (bbox[0] + 10, bbox[1] + 35), cv2.FONT_HERSHEY_TRIPLEX, 0.5, 255)
        cv2.putText(frame, f"Z: {int(coord_z)} mm", (bbox[0] + 10, bbox[1] + 50), cv2.FONT_HERSHEY_TRIPLEX, 0.5, 255)

    # Create background for showing details
    cv2.rectangle(frame, (5, 5, 175, 100), (50, 0, 0), -1)

    # Display authentication status on the frame
    cv2.putText(frame, status, (20, 40), cv2.FONT_HERSHEY_SIMPLEX, 0.5, status_color[status])

    # Display instructions on the frame
    cv2.putText(frame, f'FPS: {fps:.2f}', (20, 80), cv2.FONT_HERSHEY_SIMPLEX, 0.6, (255, 255, 255))
定义一些我们将在主循环中使用的变量
# Frame count
frame_count = 0

# Placeholder fps value
fps = 0

# Used to record the time when we processed last frames
prev_frame_time = 0

# Used to record the time at which we processed current frames
new_frame_time = 0

# Set status colors
status_color = {
    'Face Detected': (0, 255, 0),
    'No Face Detected': (0, 0, 255)
}
主循环
我们启动管道,从 “预览 “队列中获取视频帧,从 “det_out “队列中获取NN输出(检测和边界框映射)。
一旦我们有了输出,我们就在图像帧上显示空间信息和边界框。
# Start pipeline
with dai.Device(pipeline) as device:

    # Output queue will be used to get the right camera frames from the outputs defined above
    q_cam = device.getOutputQueue(name="preview", maxSize=1, blocking=False)

    # Output queue will be used to get nn data from the video frames.
    q_det = device.getOutputQueue(name="det_out", maxSize=1, blocking=False)

    # # Output queue will be used to get nn data from the video frames.
    # q_bbox_depth_mapping = device.getOutputQueue(name="bbox_depth_mapping_out", maxSize=4, blocking=False)

    while True:
        # Get right camera frame
        in_cam = q_cam.get()
        frame = in_cam.getCvFrame()

        bbox = None
        coordinates = None

        inDet = q_det.tryGet()

        if inDet is not None:
            detections = inDet.detections

            # if face detected
            if len(detections) is not 0:
                detection = detections[0]

                # Correct bounding box
                xmin = max(0, detection.xmin)
                ymin = max(0, detection.ymin)
                xmax = min(detection.xmax, 1)
                ymax = min(detection.ymax, 1)

                # Calculate coordinates
                x = int(xmin*FRAME_SIZE[0])
                y = int(ymin*FRAME_SIZE[1])
                w = int(xmax*FRAME_SIZE[0]-xmin*FRAME_SIZE[0])
                h = int(ymax*FRAME_SIZE[1]-ymin*FRAME_SIZE[1])

                bbox = (x, y, w, h)

                # Get spacial coordinates
                coord_x = detection.spatialCoordinates.x
                coord_y = detection.spatialCoordinates.y
                coord_z = detection.spatialCoordinates.z

                coordinates = (coord_x, coord_y, coord_z)

        # Check if a face was detected in the frame
        if bbox:
            # Face detected
            status = 'Face Detected'
        else:
            # No face detected
            status = 'No Face Detected'

        # Display info on frame
        display_info(frame, bbox, coordinates, status, status_color, fps)

        # Calculate average fps
        if frame_count % 10 == 0:
            # Time when we finish processing last 100 frames
            new_frame_time = time.time()

            # Fps will be number of frame processed in one second
            fps = 1 / ((new_frame_time - prev_frame_time)/10)
            prev_frame_time = new_frame_time

        # Capture the key pressed
        key_pressed = cv2.waitKey(1) & 0xff

        # Stop the program if Esc key was pressed
        if key_pressed == 27:
            break

        # Display the final frame
        cv2.imshow("Face Cam", frame)

        # Increment frame count
        frame_count += 1

cv2.destroyAllWindows()
7.输出
8.结论
这都是关于如何将任何预训练好的模型整合到我们的管道中。
在本系列的下一篇文章中,我们将探索其他可用的管道节点,以及如何将它们结合起来创建复杂的管道。
文章来源:learnopencv.com